Thursday, December 20, 2012

Chocolate Covered Cherry Bon Bons...YUM!

I love Christmas time...the hustle and bustle of the stores, the sparkly ornaments and houses decorated with bright lights, but my absolute favorite thing is making cookies.

From the time I was a little girl, we always made lots of cookies but these are my favorite ones...I guess they are more like a candy. (Just to let you know how much I love these...I hide them in the freezer so the kids don't find them!)  Whatever they are, they are delicious!!

I will warn you, you will never be able to make enough and you will be hoping for just a couple more when they are all gone, but they are someone messy to make.


Chocolate Covered Cherry Bon Bons

5 1/2 c. Powdered Sugar
3 1/2 c. Coconut
2 bars of Cream Cheese (room temp)
1 tsp. Vanilla Extract
12  Cherries (chopped finely)
2 Bags Chocolate Chips
1-1 1/2 c shaved Wax
Wax Paper

Inside Mixture:
Mix powdered sugar, coconut, cream cheese, vanilla and cherries together.  If the mixture seems too soft add a little more powdered sugar and coconut.    Place in freezer until it is firm.   Once firm, place spoon fulls of the mixture onto a cookie sheet covered in wax paper.  You may need to put the mixture back in the freezer if it starts getting too gooey.  Once done with a tray, place in the freezer to let set up again.

When spooned out mixture is set up again, in a bowl mix 1/2 bag of chocolate chips and about 1/4 c of shaved wax.  To shave the wax, I use a carrot peeler.  The wax helps the chocolate set up on the bon bons. Head the chocolate chips and wax in microwave until smooth.  Then, dip each spoonful of mixture into the chocolate, rolling it to cover them completely and place back on wax paper.

Tip: I do 1/2 bag of chocolate chips at a time, because once it cools it doesn't heat up well again.

Once done, place in freezer if desired (this is my favorite way to keep them)

Sunday, December 16, 2012

Organizing the Kitchen and Kids


Organizing My Life...

With a family of six, I need to stay organized and recruit help around the house.  These are a few ideas I came up with that are simple projects with items I had laying around the house.
This clipboard is exactly what I need since I am a list maker.  I keep it right next to the fridge for my grocery list and put my coupons in the little pocket on the bottom.


Put the Kids To Work...

I loved this project because it is SOOOO useful for our family and can change from the school year to the summer easily.  It is a cookie sheet decorated with scrapbook paper and ribbon.  The chores are printed from my label maker and put onto magnets.  I made extras that can be used during the school year such as empty folder, homework and such.  I store unused ones on the back of the cookie sheet.

This project is featured on:


Wednesday, December 12, 2012

Come Follow Me Please!

If you like what you have seen on my blog come follow me!  It's easy!  On the left side of the blog just click "Follow Me"!

Feel free to share my blog with friends as well!

I will try my hardest to give you cool project ideas and share my creativity!

Thanks Much!
Jen

A Girls Dream

Every girl dreams of having a suitcase full of sparkly, beautiful treasures!  Here is a fun new take on a jewelry box that is portable, plush and pretty.  This will be filled with scarves, hair decorations, necklaces, bracelets, earrings and hats.

This suitcase started out as an old, ugly brown with an inside that left a lot to be desired.

Here is what you will need:

~ Suitcase
~ About 2 yds fabric
~ Poster board
~Spray Adhesive
~Glue gun
~Craft glue
~  1/2" wide Elastic
~ Ribbon
~Clips
~ Batting for bottom of case
~Sewing Machine
~Iron

First of all tear out the fabric lining and save the pieces to use for a pattern, then paint the suitcase to your liking.

1.  Cut poster board to fit the top lid.
2.  The poster board pieces that go around the inside edges are four pieces.  One for each side that will rap around to both the front and back enough to hide behind the front and back pieces.
Note: the front and side pieces are all the same height.  The back piece needs to be taller to cover the hing area and tuck behind the lid piece.
3.  Cut fabric 1/2 inch larger than each of the poster board pieces and cut a fabric piece to cover the bottom and fold up the sides by about an inch.
4.  Adhere the fabric pieces to the poster board using spray adhesive.
5.  Heat an iron.  Flip each fabric covered poster board piece over, fabric side down.  Iron the 1/2 inch extra fabric around to the back side of the poster board to finish the edges nicely.
6.  Cut the batting to the size of the bottom and hot glue into place.  Place bottom piece of fabric over batting and smooth flat.  Hot glue edges up onto the sides of the suitcase.  This will be covered by the poster board pieces.
7.  Hot glue each side into place, making sure the bottom edges of the poster board pieces is tight to the bottom piece.  Wrap these pieces around the front and back suitcase panels.
8.  Hot glue front poster board piece to the front panel, fitting it tightly to the bottom.

Note: If you are adding pockets do it at this time.  Sew pockets, using your pieces you tore out from the old inside as your pattern. Pockets will wrap around the poster board lid piece before you attach it to the suitcase.

9.  The back panel that covers the hing area will need to be glued with craft glue and let dry completely.
10.  Attach the poster board piece for the lid with craft glue and let dry.
11.  Add buttons, ribbons, bows, and whatever you want to decorate with to the suitcase.

UPDATE

Abby has moved into her suitcase and loves it!


This project is linked up on:


Tuesday, December 11, 2012

It is Real or Cake?

We always love taking on a challenge and some of these cakes were definitely a challenge!  These were the ones that fooled a few.


The Tank Cake...

This one just kept getting better and better as we added small touches.  To make the cake shiny, like a toy, we painted a small amount of water over the fondant.  Then made small rivets out of fondant and painted gold luster dust (dry) over them.  


13th Birthday Long Board Cake...

This cake was only one cake deep but was about 40 inches long!  Modeled from a real Long Board.  We bought a cheap skateboard and took the wheels off and set them on the cake.  Then, free-handed a design to represent the things that this 13 year old boy liked.  His friend came in and went to pick it up, thinking it was his long board present.


The Golden Pig...

The golden pig is a good luck charm and perfect for 20th "Golden" Birthday.  This pig was free standing on legs made of rice crispy treats.  The bottom half of the pig is made from half a styro-foam ball and the cake is the other half.  The whole pig was then painted with golden luster dust mixed with vodka.


XBOX: Game over cake...

This cake was made for a Grooms Dinner with the "Game Over" emblem on it.  It was a huge hit at the party!  The controler was made of rice crispy treat.

Sunday, December 9, 2012

Door Shelves


Hollow Core Door Shelves

Shelves can be expensive...even a short one can cost you $20.00 easily, but here is a very inexpensive way to create cool shelves.

Here is the key to keeping cost down on this project....shop the clearance sections at home improvement stores.

We found our door (we used one for the two shelves pictured below) for $1.00  in the clearance/wrongly ordered door section.  We checked the clearance section then for hinges and door knobs and voila...our set!  We spent less than $20.00 on both of these shelves and they are 6 feet long.

So how do these shelves work?

~ A Door
~ 1x1 Boards
~ Knobs and Hinges
~ Paint
~ Screws
~ Level

1. Cut the door to the width you want your shelf.  For our shelves, the door was narrow enough, so we just cut it in half.
2.  Paint your door.
3.  Mark your wall where you want the shelf.
4.  Cut your 1x1 board a little shorter than your shelf.
5.  Screw the 1x1 board to the wall, Make sure to level it!
6.  Slide your door shelf onto the 1x1 in the hollow part of the door.
7.  Place screws through the top of the shelf, into the 1x1 every 6 inches or so.
8.  Place knobs and hinges onto the shelves.


Saturday, December 8, 2012

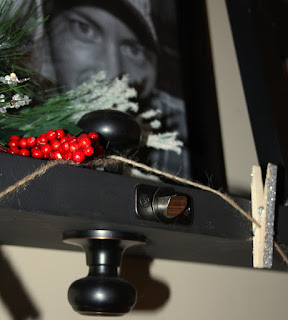
Sparkle on a String

I love getting Christmas cards...it is like hearing "I'm Thinking of You!" over and over.  But with a huge family ( I do mean HUGE!) I get tons of cards and every year I wonder how I could display them best.  This year, I am prepared for the Christmas wishes, so bring them on!

What you need:
Shoebox
Glitter
School Glue/Craft Glue
Clothes Pins
Paint brush
Small plastic bowl
Twine


1.  Squeeze some glue into the plastic bowl and stir in a small amount of water to thin the glue out.
2.  Paint the glue onto one side of the clothes pins.  I found it easiest to leave them clipped to the cardboard they come on and apply the glue.
3.  In the shoebox, sprinkle the glitter onto the clothes pins.
4.  Let dry and repeat on other side.
5.  String up some twine and pin your cards up.

Note: If you are doing white, I suggest spray painting your clothes pins white first or they will show the wood color through the glitter.

Related Posts Plugin for WordPress, Blogger...