Showing posts with label paint. Show all posts

Sunday, March 1, 2015

The Perfect Hutch Makeover

Before the Makeover
Scott after sanding in the garage...Yikes
Now that our new barn wood table is finished (see earlier post) our 90's honey oak hutch needed a makeover.  So Scott started sanding it down, removed the mirrors and glass from the doors.  His goal was to have it done by Christmas and sure enough, he
made it!

The hutch was sanded, painted with a primer, then painted white with a satin paint.  Turqouise and red paint were painted randomly in splotches.


Elmer's glue was painted in random areas (for crackle effect) and then another coat of white was painted over everything.  Finally, a stain was painted over the entire piece.  The leaded glass panels were removed from the front doors and chicken wire replaced it.  The mirror was also taken out of the back and bead board was painted in the same process as the rest of the hutch and placed in the back of the hutch.


Come join the Link Party on...

I was featured on Remodelaholic

Friday, January 18, 2013

Chalkboard Obsessed!

Do you love chalkboards as much as I do?  If so, here is a project for you.  See how easy it is to create a chalkboard in about an hour.  I have a few more chalkboard projects around the house.  Thought I'd share my obsession with you!


Here's how to make a quick chalkboard...

1.  Find a frame or surface for your chalkboard.
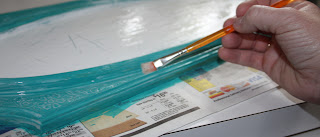
2.  Paint the frame in desired color.  Here I've painted it turquoise, sanded the edges and wiped a little stain onto the frame.
3.  Roll chalkboard paint onto surface.  I recommend two coats.
4.  Have fun Expressing Yourself!


Great for special announcements too...

Happy Chalking!


Sunday, January 13, 2013

Lamp...Repainted

OMG...I'm jumping up and down with excitement!  I found this plaster lamp at a thrift store yesterday for $10.00 with the lampshade and all!  It was pretty boring but I jazzed it up a bit today.


  1. Painted it with primer
  2. Painted it with a turquoise satin paint.
  3. Painted it with a dark stain and then rubbed it off with a cloth.
That is it...My new turquoise lamp!

Linked up on:


Saturday, December 29, 2012

Monogram Frame

Scott and I love to go to thrift stores and little vintage shops around town to see what we can find to refinish or repurpose.  This is a plastic frame I found that I thought was very cool but a very ugly pea green.  Scott was not seeing my vision for it but I took a little time today to refinish it and make it into a monogram frame for our entry way.

You will need:
Frame
Turquoise craft paint
Elme'rs Glue
White Paint
Dark Wood Stain
Ribbon
Cardboard Letter
Paint Brushes

~ Paint the frame turquoise
~ Paint glue over areas that you desire to be crackled
~ Let glue become tacky...Don't let it dry too much!
~ Paint white over tacky glue. Let dry
~ Paint stain over desired areas and rub off with cloth
~Add embellishments


Tips:   Do small areas of glue so you don't feel rushed when painting over it.  Remember...Don't let the glue dry too much or it will not crackle.  If you want a little more color use a dry brush to add a little more color like I did on the top ornament and outside frame shown above.


Colorful Canvas Paintings


Canvas paintings are fun, easy and a quick afternoon project.  I completed these in about an hour and a half. I started with three canvas' I bought at Michaels, some 3D stickers and craft paint.


I placed the 3D stickers onto the canvas to create a design.  I found these stickers at Michaels in the scrapbooking area.  They look like school glue made into designs.

Make sure they are pressed down well so they don't lift up when painting.


I worked quickly with the craft paint so that I could blend the colors somewhat around the edges to give it a bit more interest.  If the paint started to dry I would reapply it and blend again.

Have an idea of what design you would like and freestyle it!  This is quite hard for me since I am a very detailed artist but I wanted it to be simple, fun and bright.

Tip: If you paint something you don't like simply let it dry and paint over it.
Photobucket

Friday, December 7, 2012

Revive An Old Bed...

A few weeks ago, Scott's Mom gave us her old full size bed for our youngest.  She was pretty excited to graduate from a twin to a full size bed...a sign of becoming a big girl!  The bed needed a little personality, so we threw our creativity at it and this is what we got...

We also found a mirror for $10 and painted it to match the bed.
PJH Desisgns

Thursday, December 6, 2012

Try....You never know what you can make!

 Our New Kitchen Table...

As kids, we used to visit my Aunt and Uncles farm on a regular basis and I have very fond memories of being there.  Chasing the baby pigs when they got out of the pen, climbing up in the hay lofts of the big barn and seeing all the mice and kittens up there are just a few of my memories.

A few weeks ago, we went out to store the boat in the barn and asked if we could take a few planks of old barn wood they had laying around.  I could see Scotts wheels turning as we loaded the long, cool, paint chipped planks into the truck.

On the way home he decided he was going to make a table for our new, big family!  With six of us, we needed a big, kick ass table!  He did warn me that he had no idea how he was going to make it and it may not turn out, but what the heck!  If if did turn out it would indeed be Kick Ass!!!

He came up with a plan and after a week and a half of hard work and trial and error, our new barn wood kitchen table is gracing our dining room!  It is beautiful and fits us all comfortably!   Our first piece of furniture to pass down to the kids someday!

Yes...you may have noticed the "lovely" 90's hutch in the background.  That is our next project!


Related Posts Plugin for WordPress, Blogger...